

The Deduction Management for D365 Finance will be divided into three parts as mentioned in Part 1 of my post to cover the various setups and operations involved. The first part will focus on the setup process for deduction management. The second part will explore different methods for entering deductions and their respective outcomes. Finally, the third part will delve into the further processing of deductions within the Deduction Workbench.
Deduction Management: Part 1
Deduction Management: Part 2
In Part 3 of the Deduction Management series, this article will discuss the several options available for further processing the deductions within the Deduction Workbench.
When the investigation for deductions given has concluded, user may further process the deductions within the Deduction Workbench. For example, the deduction can be split into 2 parts to apply partially on an invoice, denied, written off. etc.
To see all the available actions, navigate to Sales and marketing > Trade allowances > Deduction > Deduction workbench, and select “Maintain” on the ribbon.

New deduction
We will not be discussing this option in this article as it has been explained in Part 2 of the series.
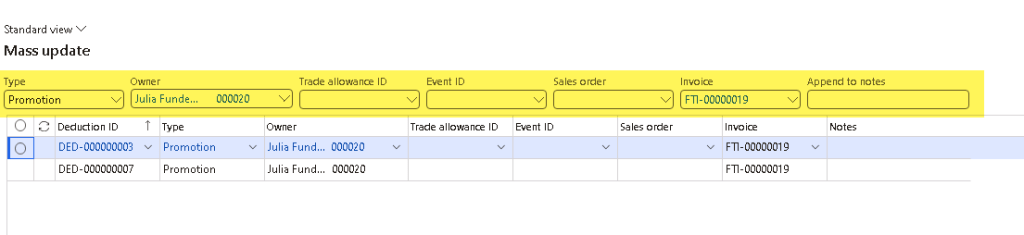
Mass update
Mass update can be done for deductions that were created from Customer Payment Journal that do not have a Claim reason.
Select the deductions that needs to be mass updated, and click Maintain > Mass update.

User may select the field with data that needs to be updated on the top section and it will apply the value to all the lines.
Approve deduction
Approve deduction option is only available for deductions created through Deduction Workbench, Customer Settlement Form, or Customer Page when “Create Claim Journal” is set to “No”, hence creating a deduction line with Status = “Created”.
Select the deduction with Status = “Created” and click on Maintain > Approve deduction.
It will prompt you to enter Notes as needed and the Item sales tax group, so that it could create a free text invoice for price based claim (or return order / negative sales order if it is a quantity based claim and “Create return order” setting on AR parameters is set to “Yes”).
After the free text invoice (or return order / negative sales order) is created and posted, the Status of the deduction will be updated to “Open” and the Claim status will be updated to “Accepted”.
The posted free text invoice / return order / negative sales order will also now appear on the Open transactions section to Match with the deduction.
Match
Match option is available if there was a deduction posted on the customer account with an Accepted claim status (which means the deduction was approved), or when the deduction is attached to an existing credit.
Users can mark the deduction against the Open transactions, then select Maintain > Match on the ribbon. If a balance remains in the deduction, this balance appears in the Remaining amount field on the Deductions section. If there are multiple Open transactions to be selected for matching, user can click on “Select deduction amount” and select the criteria where the amount should applied first.
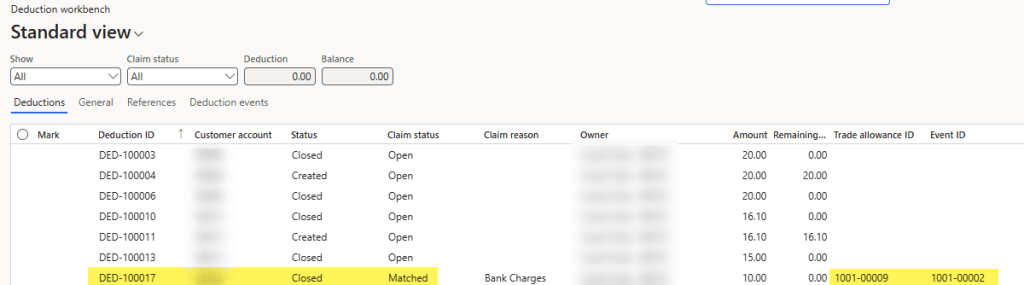
The matched deduction will now have a status of “Closed” and a claim status of “Matched”.

On the customer transaction, the free text invoice credit posted will be settled against the claim as well.
Split
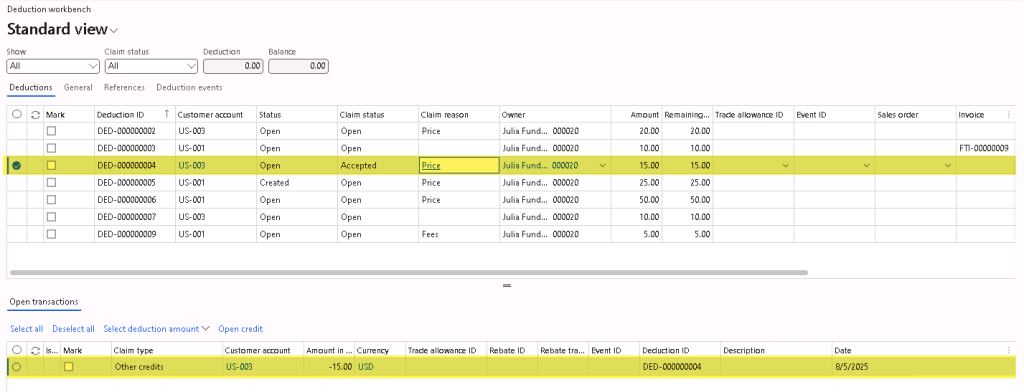
The split option can be used to split a deduction into 2 separate deductions to be processed separately.
For example, after giving a $15 deduction to a customer, it was decided that $10 will be applied/matched with a credit and $5 will be written off.
The split option can be used for deductions that has an “Open” status. User can also select multiple deduction lines to process the split in single dialog.

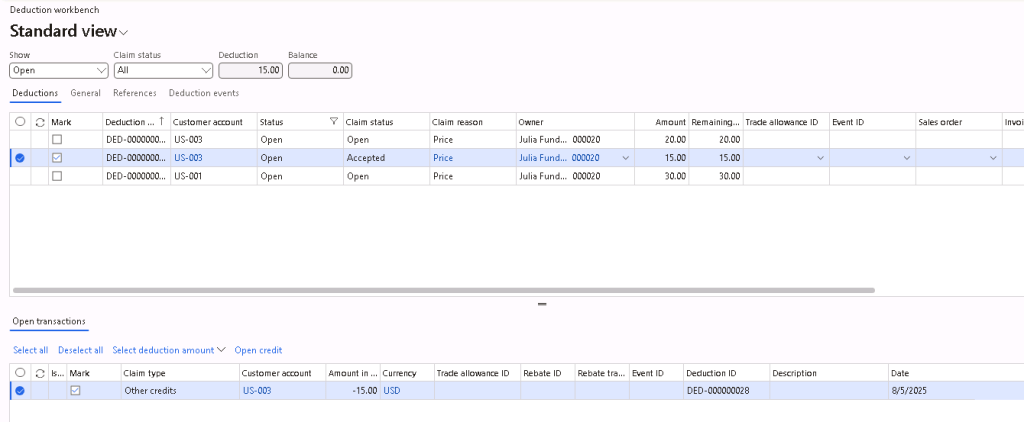
After splitting the deduction, a new deduction line will be created for each deduction that was split, displaying the deduction amount as the Split amount.
Under the “References” tab on the new deduction line created, user can also find the Original deduction ID where the amount was split from.
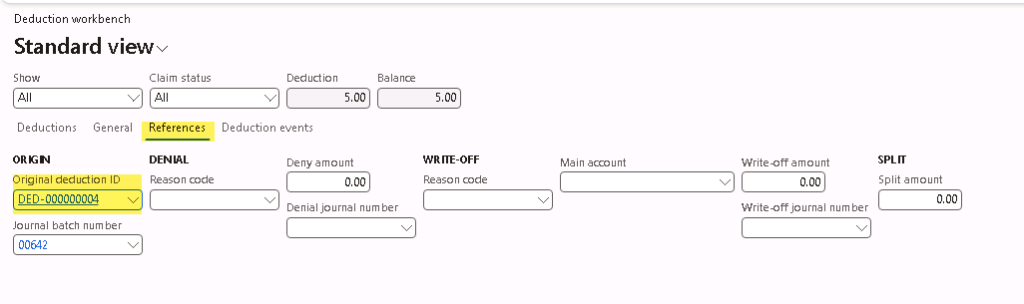
Under the “References” tab on the original deduction line, user can also find the Split amount that was split off from the original amount as well.
Attach invoice
For deductions that were created through Deduction Workbench, Customer Settlement Form, or Customer Page, and if the Invoice field is blank, user can choose to attach an open invoice to this deduction to settle the deduction with an invoice.
Select the deduction line and click Maintain > Attach invoice. Select the invoice to attach, and if upon creating the deduction through Deduction Workbench, Customer Settlement Form, or Customer Page, and selecting “Yes” for Create claim journal, after choosing the invoice to attach, it will open a settlement screen and the invoice will be marked for settlement automatically. Click on Post and the deduction line will be updated with the invoice and the customer transaction for the deduction and invoice selected will be settled against each other. (If claim journal was not posted yet, then user can still attach an invoice to this deduction, but it cannot be settled yet)

Detach invoice
Deduction lines that have invoice attached can detach the invoice from the deduction line by selecting the deduction line and clicking on Maintain > Detach invoice. If the deduction line was settled against an invoice, it will unsettle the transaction upon detaching the invoice.
Deny
Transactions can be denied in the Deduction workbench after investigation is completed if the deduction is not valid. User can select one or multiple deduction lines, and click Maintain > Deny to process the deduction denial by entering a Reason code.

- For deductions created through Customer Payment Journal:
- After denying the deduction, the Status will be updated to “Closed” and the Claim status will remain as “Open”.
- The deduction will be reversed and posted via a Deduction journal.

- For deductions created through Deduction Workbench, Customer Settlement Form, or Customer Page with claim journals posted, and with no invoice attached:
- After denying the deduction, the Status will be updated to “Closed” and the Claim status will be updated to “Rejected”.
- No financial implication as the deduction has not been matched/settled yet.
- For deductions created through Deduction Workbench, Customer Settlement Form, or Customer Page with claim journals posted, and with invoice attached and settled:
- After denying the deduction, the Status will be updated to “Closed” and the Claim status will be updated to “Rejected”.
- Invoice will be detached from the deduction line and the settlement for the open invoice and deduction will be reversed.
- For deductions created through Deduction Workbench, Customer Settlement Form, or Customer Page with no claim journals posted (not approved yet):
- Denial will not be allowed since the deduction status is still in “Created”.
If a denial needs to be reversed, user can select the “Closed” status and “Rejected” claim status deduction line and click on “Reverse denial” on the ribbon. This will bring the deduction line back to “Open” status and “Open” claims status.
Write-off
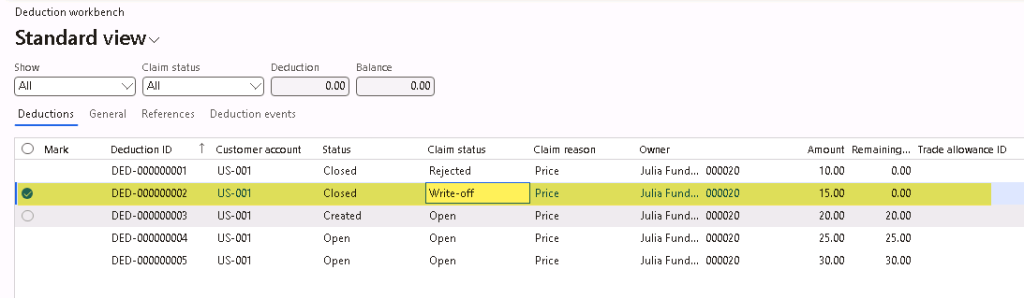
Write-off can be done on deductions that has an “Open” status. Select he deduction line and click on Maintain > Write-off. Then, enter the Write-off reason code. This will update the deduction line status to “Closed” and claim status of “Write-off”.
It will also post a claim journal to write-off the deduction based on the main account selected on the write-off reason code setup. User will have to manually settle the open customer deduction transactions and apply the write-off to an open transaction (if automatic settlement is not setup).

If a write-off needs to be reversed, user can select the “Closed” status and “Write-off” claim status deduction line and click on “Reverse write-off” on the ribbon. This will bring the deduction line back to “Open” status and “Open” claim status. It will also post a claim journal to reverse the write-off posted.

Create return order
The Create return order option is only available for Quantity based claim with the Claim status = “Open”. This option is also only available if on the AR Parameters page’s Deduction tab, the “Create return order” is set to “Yes”, and “Create return order prior to deduction approval” is set to “Yes”.
After clicking on Maintain > Create return order, and entering any notes as needed, a dialog will open to allow users to select the applicable sales invoice to copy details to the return order/negative sales order that will be created.
Select if all lines on the invoice or only certain lines need to be copied over, and adjust the quantity value on the lines as needed.
After confirming the details, click OK and a Returned order (RMA) will be created.
On the RMA’s Header section, the Deduction ID is attached to it for reference.
The RMA can then be further processed and once the RMA’s invoice is posted, the deduction can be matched with the open transactions.
Attach deduction to credit
Assuming there are credits that were created outside of the deduction management process, and a deduction was created without knowing the credit was already created outside this process. To avoid posting the credit twice to the customer, it is possible to attach the deduction to a credit that was already created outside the deduction management process, before the deduction is approved.
The Attach deduction to credit option is available if the Claim status of the deduction line = “Open”.
Upon clicking on Maintain > Attach deduction to credit, a dialog box will open for user to select which document to attach the deduction to.
Select the document, and upon navigating to the document, the Deduction ID can be seen on the document’s header.
Once the deduction is approved, and when the document invoice is posted, the Open transaction will show the posted credit and can now be matched against the deduction line.
Detach deduction from credit
If upon investigation complete and the deduction should be removed from the credit, user can click on Maintain > Detach deduction from credit. This option is only available if a credit was attached to the deduction and the Claim status = “Open”.
Settle deduction as one-time promotion
To settle the deduction with a one-time promotion, the trade allowance template must be setup for the customer with a lump sum payment and a fund.
User can then select the deduction line, click on Maintain > Settle deduction as one-time promotion. Then, user can select the Fund ID for this promotion and enter the Percentage (the total Percent allocated to the funds must equal to 100).
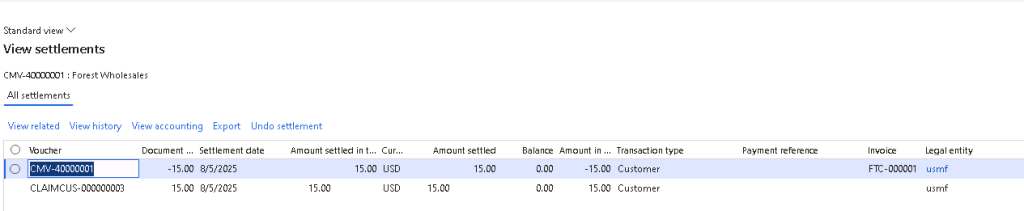
Upon click OK, the system will automatically create a Free Text Invoice to record the promotion and settle against the deduction line. The deduction line will then have a Status = “Closed” and Claim status = “Matched”.


Leave a comment