

D365 supports two different prepayment methods for vendors – one with an invoice and one without, similar to my previous blog posts regarding Customer Prepayments. In this blog post, I’ll be discussing the differences between Vendor Prepayment Invoice vs Vendor Prepayments and walkthrough an example of a Vendor Prepayment Invoice.
See related posts:
Customer Prepayment Invoice Feature
Customer Prepayment without an Invoice
Vendor Prepayment without an Invoice
When to use vendor prepayment invoicing vs. vendor prepayments?
| Prepayment invoicing | Prepayments |
| A prepayment invoice is created | No prepayment invoice needs to be created |
| Payment is applied to the prepayment invoice | Payment is not applied to any invoices |
| Prepayment value is defined on the purchase order | No prepayment value is defined on the purchase order |
| Only 1 prepayment can be defined and paid for 1 purchase order | No limit of number of prepayments to be paid to the vendor |
| Liability for prepayment is held in the AP account. | Liability for prepayment is held in the prepayment account, not the AP account |
| The vendor balance does not reflect the prepayment amount paid to the vendor since it is settled with the prepayment invoice upon payment. | The vendor balance reflects the prepayment amount paid to the vendor until it is applied to the vendor invoice. |
| Depending on the AP Parameter setup, prepayment is applied manually or automatically to invoice during the purchase order invoice posting. | User needs to manually apply the prepayment amount to settle against the posted vendor invoice balance. |
| Depending on the AP Parameter setup, the prepayment amount will automatically be applied to the purchase order invoice or a warning message will appear if the prepayment amount is not applied to the vendor invoice upon creating the purchase order invoice | No warning or indication if the prepayment amount is not applied to the vendor invoice. |
The vendor prepayment invoice function has 3 major steps and depending on if you need the Prepayment AP liability to post to the same regular AP liability or not, it will have 2 different scenarios with the following accounting implications:
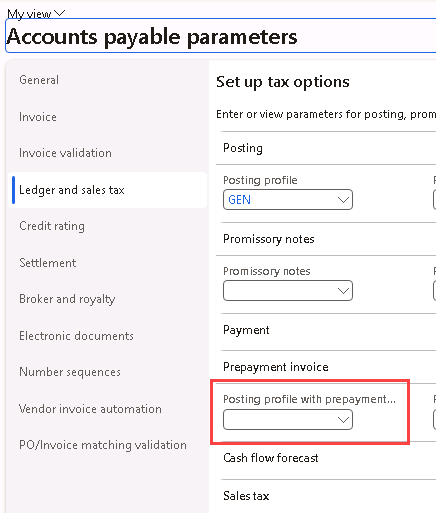
Scenario 1: If the Prepayment AP liability is posted to the same regular AP liability, then you could leave the AP Parameter for “Posting profile with prepayment vendor invoice” blank.
- Create purchase order with prepayment invoice
Debit Prepayment (As setup on Inventory Posting) $200
Credit Accounts Payable (As setup on General Vendor Posting Profile) $200
- Pay prepayment invoice with payment journal
Debit Accounts Payable (As setup on General Vendor Posting Profile) $200
Credit Bank $200
- Create final purchase order invoice
Debit Expense $900
Credit Accounts Payable (As setup on General Vendor Posting Profile) $900
Debit Accounts Payable (As setup on General Vendor Posting Profile) $200
Credit Prepayment (As setup on Inventory Posting) $200
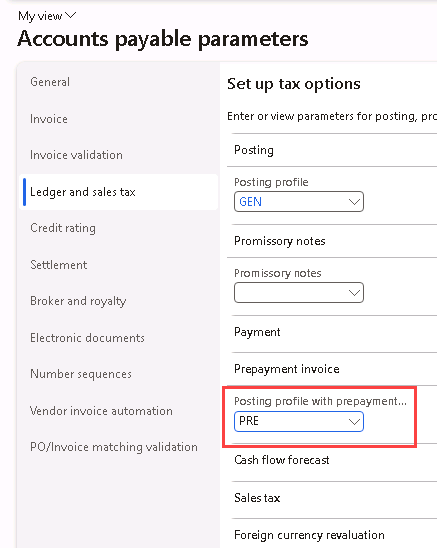
Scenario 2: If you would like to offset the Prepayment AP liability to a different AP account than regular AP liability posting, then create a new Vendor posting profile and select on the AP Parameter for “Posting profile with prepayment vendor invoice”:
- Create purchase order with prepayment invoice
Debit Prepayment (As setup on Inventory Posting) $200
Credit AP – Prepayment (As selected on Posting profile with prepayment vend inv) $200
- Pay prepayment invoice with payment journal
Debit Accounts Payable (As setup on General Vendor Posting Profile) $200
Credit Bank $200
An additional voucher is created for settlement
Debit AP – Prepayment (As selected on Posting profile with prepayment vend inv) $200
Credit Accounts Payable (As setup on General Vendor Posting Profile) $200
- Create final purchase order invoice
Debit Expense $900
Credit Accounts Payable (As setup on General Vendor Posting Profile) $900
Debit Accounts Payable (As setup on General Vendor Posting Profile) $200
Credit Prepayment (As setup on Inventory Posting) $200
Complete the necessary setups
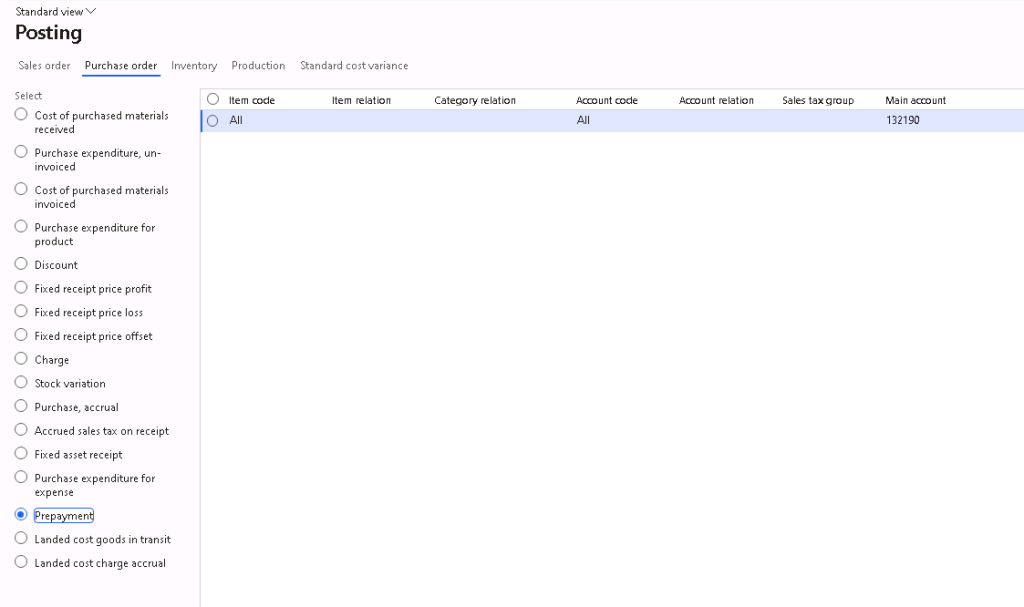
Navigate to Inventory management > Setup > Posting > Posting, under the Purchase order tab > Prepayment and enter the posting account for the prepayment.
You may skip this step if you are following Scenario 1. Otherwise, you may navigate to Accounts payable > Setup > Vendor posting profiles and create the Vendor posting profile for prepayments.

You may skip this step if you are following Scenario 1. Otherwise, navigate to Accounts Payable > Setup > Accounts Payable Parameters, under the Ledger and sales tax tab > Prepayment section and update the AP Parameter for “Posting profile with prepayment vendor invoice” with the posting profile created in previous step.
Navigate to Accounts Payable > Setup > Accounts Payable Parameters, under the Ledger and sales tax tab > Prepayment section, select if the Prepayment application policy should be Notification or Automatic.
- Notification – When creating the final sales invoice, user will get a notification that there are available prepayments which has not been applied yet, and user will have to manually apply the prepayment to the Sales invoice.
- Automatic – Prepayments will be automatically applied to the sales invoice when sales invoice is being created.

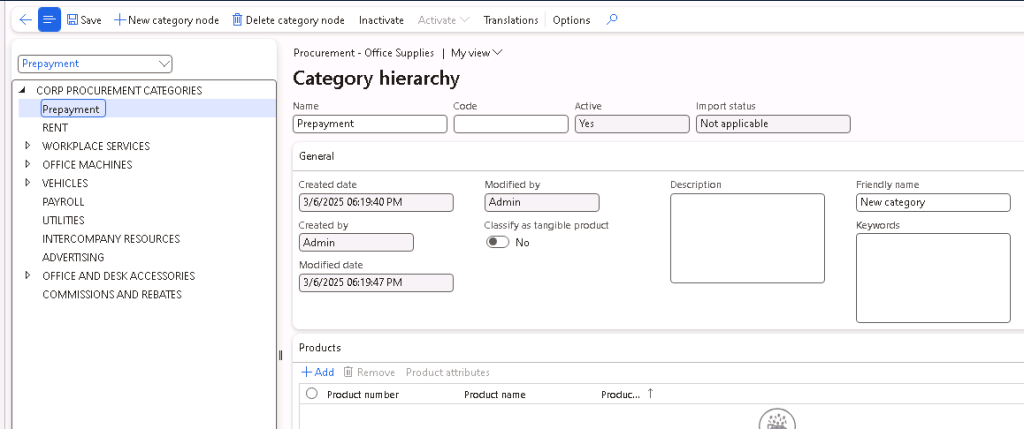
Navigate to Procurement and sourcing > Procurement categories, click on Edit category hierarchy. Then, create New category node for Prepayment and Save it.
Step 1: Create purchase order with prepayment invoice
Create a purchase order (AP > Purchase orders > All purchase orders) with purchase order line items and confirm the purchase order.
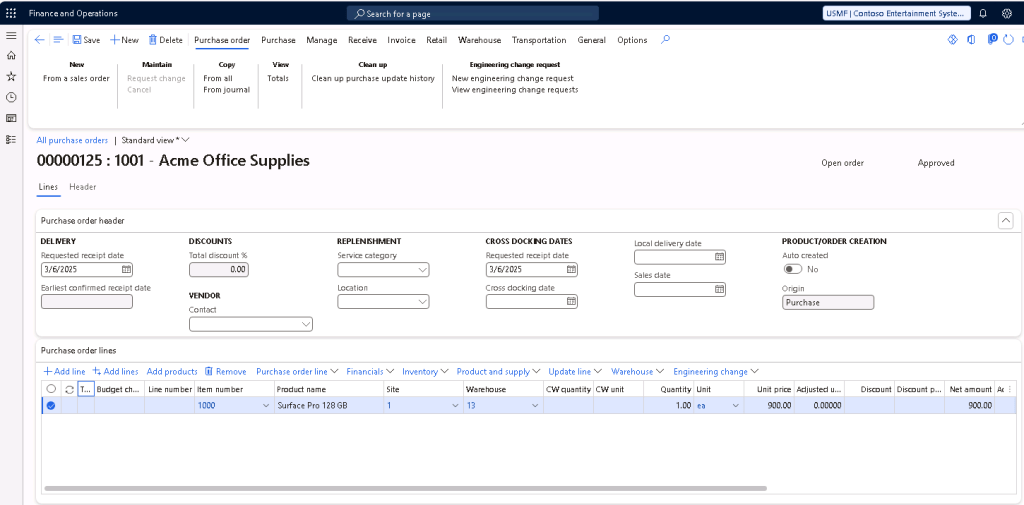
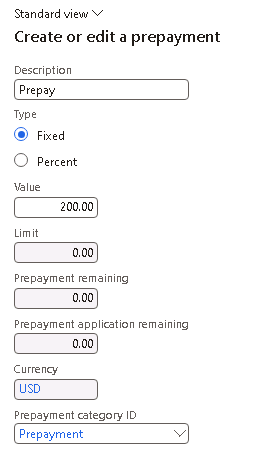
On the ribbon, select Purchase > Prepay > Prepayment. Select if the Prepayment should be Fixed or Percent, then enter the value accordingly and Save.
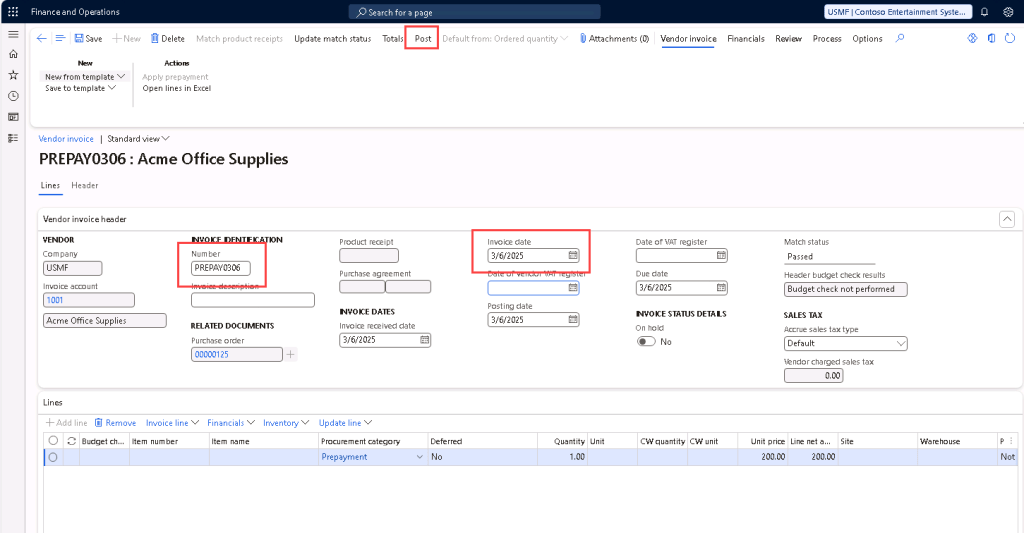
Then, back on the Purchase order ribbon under Invoice > Generate > Prepayment invoice.
Enter the invoice number, date, and other information as needed. Then, post the prepayment invoice.

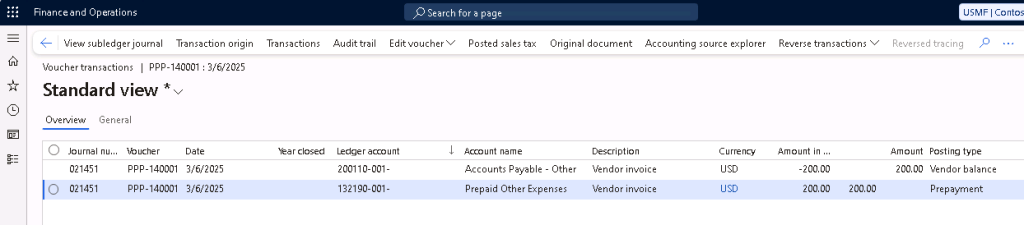
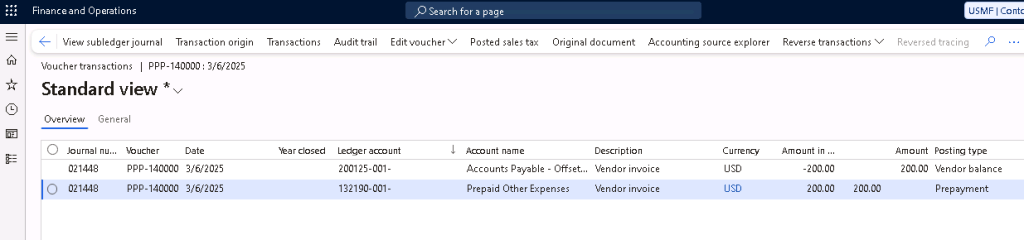
Scenario 1 – The liability offset is posted to the General AP Posting Profile liability account
Scenario 2 – The liability offset is posted to the Prepayment Posting Profile liability account as selected on the AP Parameter’s “Posting profile with prepayment vendor invoice” field.
At this point, you could still remove the prepayment if it is deemed not needed. On the Purchase Order ribbon, click on Purchase > Prepay > Remove prepayment and the posted prepayment invoice will be reversed.
Step 2: Pay prepayment invoice with payment journal
Create a vendor payment journal (Accounts payable > Payments > Vendor payment journal).
Enter the vendor account and click Settle transactions to pay the prepayment invoice.
Post the vendor payment journal.
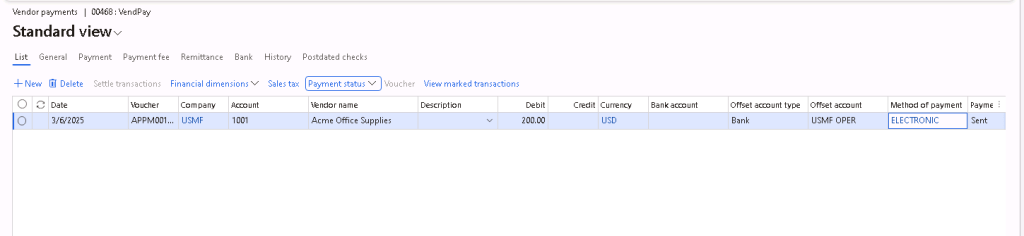
Scenario 1 – Posts 1 payment voucher that offsets the General AP Posting Profile liability account and Bank account.


Scenario 2 – Posts 1 payment voucher that offsets the General AP Posting Profile liability account and Bank account; and 1 voucher to settle the General AP Posting Profile liability account with the Prepayment Posting Profile liability account as selected on the AP Parameter’s “Posting profile with prepayment vendor invoice” field.


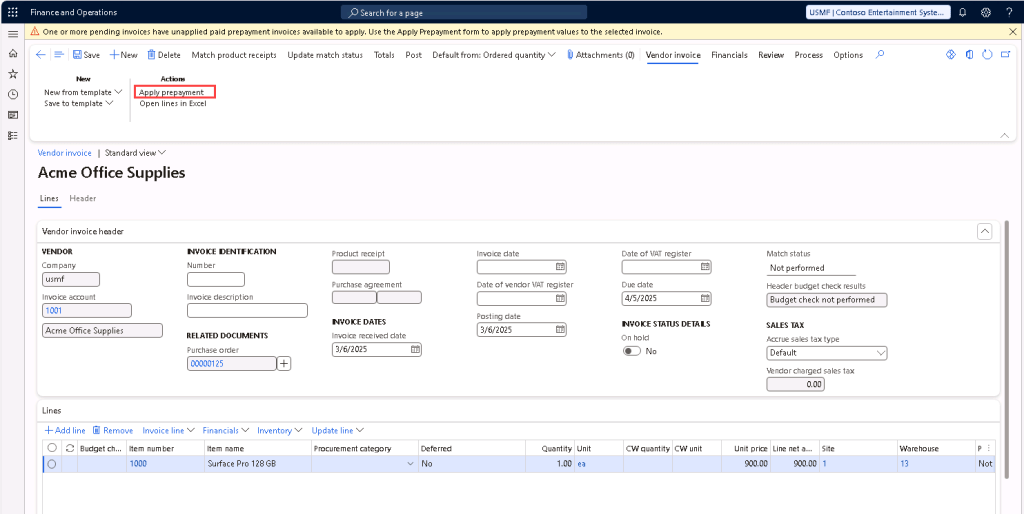
Step 3: Create final purchase order invoice
Generate the final invoice as you would normally generate invoice for the purchase order, Invoice > Generate > Invoice
Note: If you selected “Notification” on AP Parameter’s “Prepayment application policy“, then you’ll see a notification that there is unapplied paid prepayment invoices available to apply. If you selected “Automatic“, then it will automatically apply the prepayment for you and create the prepayment line on the pending vendor invoice.
To apply the prepayment manually, click Vendor invoice > Actions > Apply prepayment.
Select the prepayment to apply and click on “Apply prepayment“.
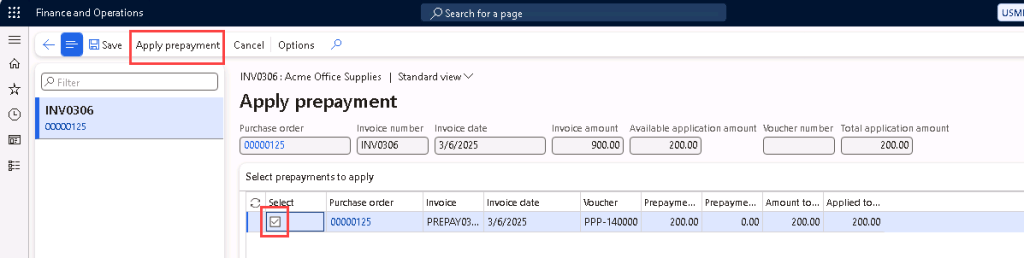
You’ll see that a new line for prepayment is added onto the invoice lines.
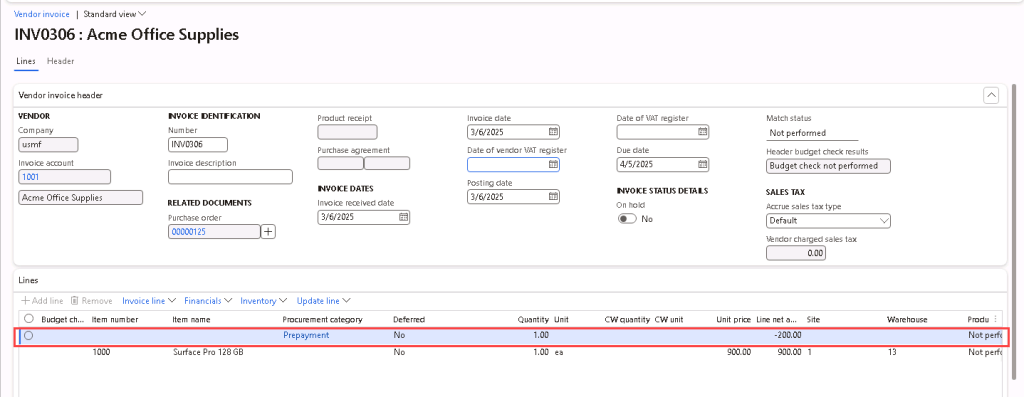
Enter the invoice number, invoice date and other information as needed and perform the match status and approval as needed. Then, post the invoice.
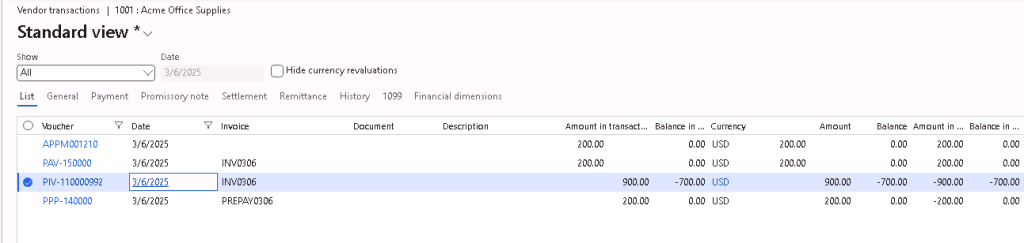

If you have forgotten to apply the prepayment during final invoicing, after posting the final invoice, you will see the warning message where there’s a prepayment amount that is not applied completely.

Then, you may go to Accounts payable > Vendors > All vendors > Invoice tab > Prepayment > Apply.
Select the prepayment invoice that should have the prepayment applied to and click “Apply prepayment“.
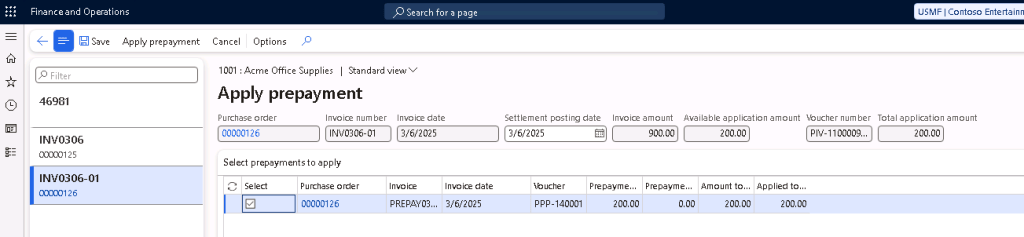
Then, the voucher for prepayment application will be posted and the final vendor invoice balance will be updated to reduce the prepayment applied.

Reverse a prepayment
If a prepayment that was already applied and posted needs to be reversed, you may do so via Accounts payable > Vendors > All vendors > Invoice tab > Prepayment > Reverse. Select the prepayment that needs to be reversed and click “Reverse prepayment application“.

This would reverse the prepayment applied to the vendor invoice and the prepayment amount can be applied to another open purchase order invoice – it is recommended to only apply it to another open purchase order invoice instead of the original purchase order invoice only if the prepayment is no longer needed on the original purchase order invoice.


Leave a comment